One-time build
This section builds everything once. Each step uses the mouse wherever Windows has a screen for it. Where only a command works, or a command is clearly easier, the step says so and gives the command.
How to read the screenshots
Red boxes with numbers show what to click. The number in the step text matches the number on the picture, for example 1. All server screens come from our lab server named OFFLINE-WSUS. The online server shows the same console.
GUI means you do it with the mouse. CLI means you type a command in PowerShell, run as administrator.
What needs the command line
| Task | Method | Why |
|---|---|---|
| Install the WSUS role and choose options | GUI | Server Manager and the WSUS console cover it. |
| Sync, find, approve, decline an update | GUI | All in the WSUS console. |
| Cleanup wizard | GUI | WSUS console, Options. |
| Take or restore a checkpoint | GUI | Hyper-V Manager. |
| Restart BITS or WSUS service | GUI | Services console. |
| Client WSUS policy | GUI | Group Policy editor. A registry command is the quick alternative. |
| Install on the client, check the build | GUI | Settings and winver. |
| Foreground download setting | CLI | No screen for it in Windows. |
| Check download size and which files are new | CLI | The console lists files but does not add them up or compare with disk. |
| Hash check of every file | CLI | No screen for it. |
| Export and import the catalog | CLI | wsusutil has no screen. |
| Carry only the new files | CLI or File Explorer | Explorer copy works if you pick files from the list the script prints. |
| Trim hundreds of old updates, reindex the database | CLI | Selecting hundreds of rows by hand is slow, and indexing has no screen. |
4.1 Isolated network (lab)
GUI In Hyper-V Manager, click Virtual Switch Manager… in the Actions pane (top right, see the screenshot in Monthly routine, step 4). Choose Internal, click Create Virtual Switch, and name it OfflineNet. Do not create a NAT. Give the offline servers static addresses on 10.0.0.0/24 and no default gateway.
CLI The same thing in one block, plus the address on the host side:
New-VMSwitch -Name OfflineNet -SwitchType Internal
New-NetIPAddress -InterfaceAlias "vEthernet (OfflineNet)" -IPAddress 10.0.0.1 -PrefixLength 24
There is no New-NetNat on purpose. Then prove the isolation from the offline server. The first command tries the online server and must fail. The second must return nothing, because there is no default route.
Test-NetConnection 192.0.2.2 -Port 22
Get-NetRoute -DestinationPrefix 0.0.0.0/0
Check
A Windows 11 Hyper-V host can forward packets between adapters if routing is on. Run Get-NetIPInterface | Select InterfaceAlias,Forwarding and make sure forwarding is Disabled.
4.2 Install the WSUS role
GUI Do this on both servers. These first screens are the ones we captured.
-
Open Server Manager
Click the Start button, then 1 Server Manager. On Windows Server it also starts by itself after sign-in.
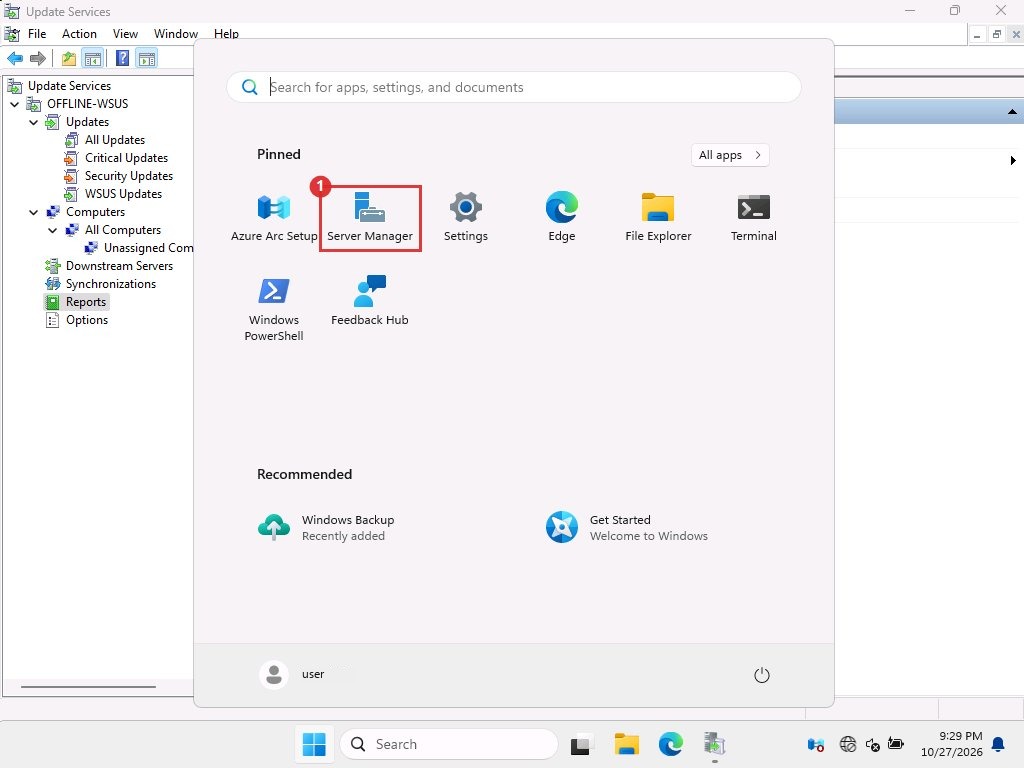
Start menu. Server Manager is pinned. -
Start the Add Roles wizard
In Server Manager click 1 Manage, then 2 Add Roles and Features. On the first pages click Next, choose Role-based or feature-based installation, and pick your server from the list.
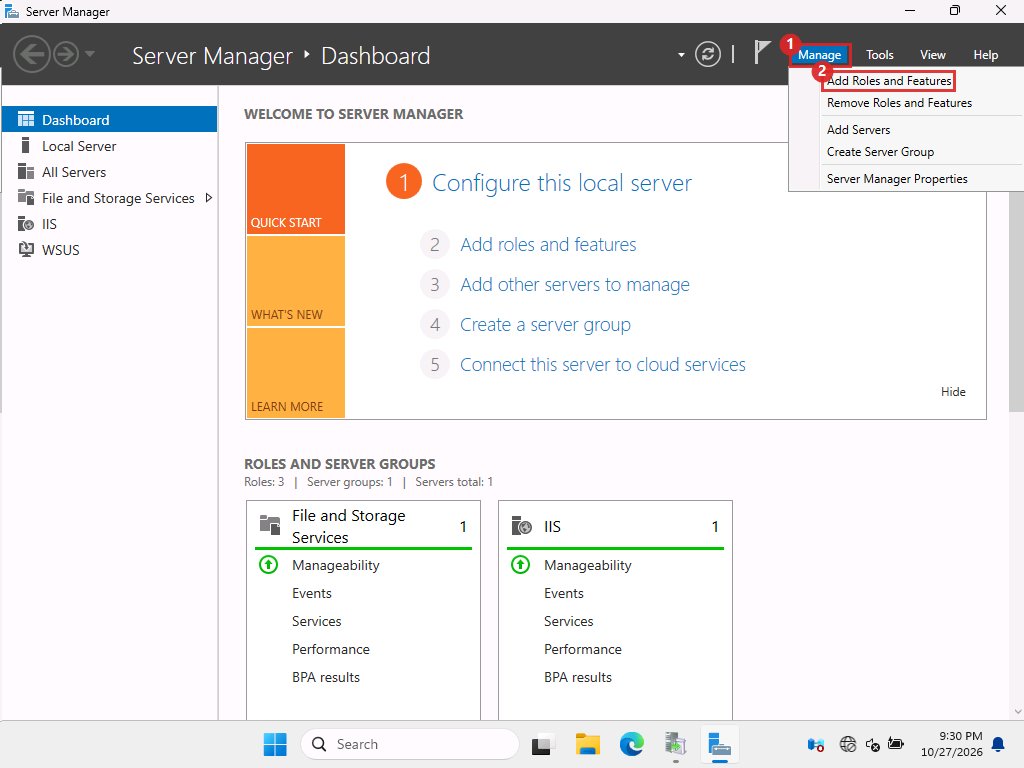
Manage menu. -
Tick the WSUS role
On Select server roles, tick 1 Windows Server Update Services. A box asks to add required features, so click Add Features. Then 2 Next.
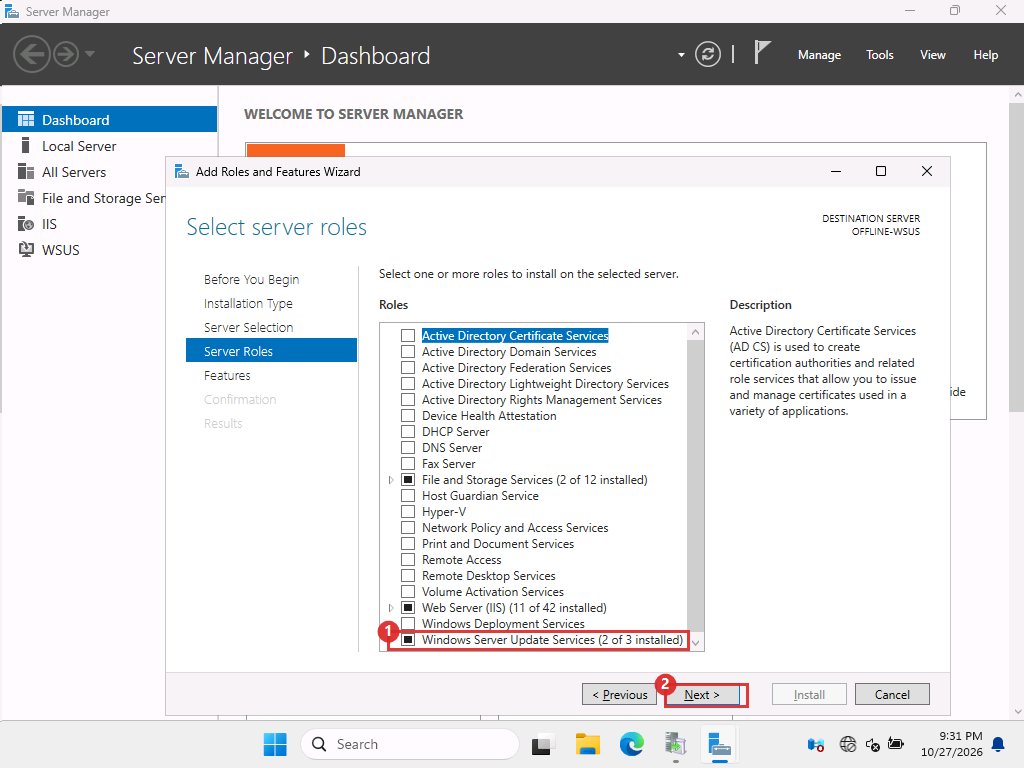
Our server already had WSUS, so its row reads "2 of 3 installed". On a new server it is an unticked box. -
Finish the wizard
We did not capture the remaining pages because the role was already installed. They are the standard ones:
- Features: keep the defaults, Next.
- Windows Server Update Services info page: Next.
- Role Services: keep WID Connectivity and WSUS Services ticked, and leave SQL Server Connectivity unticked. This gives the local Windows Internal Database.
- Content location: tick Store updates in the following location and type the folder, for example
C:\WSUS. - Web Server (IIS) pages: Next through them. Then Install.
When it finishes, a yellow flag appears in Server Manager. Click it, then Launch Post-Installation tasks. This runs
wsusutil postinstallfor you. -
Skip the first-run wizard on the offline server
The first time you open the WSUS console it may offer a WSUS Configuration Wizard. On the offline server click Cancel. Its connect step needs the internet. You set the same options by hand in 4.4. On the online server you can use it, or the same Options screens.
CLI If you prefer commands:
Install-WindowsFeature -Name UpdateServices -IncludeManagementTools
& "$env:ProgramFiles\Update Services\Tools\wsusutil.exe" postinstall CONTENT_DIR=C:\WSUS
Content folder
Our online server used C:\WsusContent and the offline server used C:\WSUS\WsusContent. Read the real path from the registry in scripts: (Get-ItemProperty 'HKLM:\SOFTWARE\Microsoft\Update Services\Server\Setup').ContentDir, then add \WsusContent.
4.3 Open the WSUS console
GUI In Server Manager click 1 Tools, then 3 Windows Server Update Services. The same menu has 2 Services, which you need later to restart BITS.
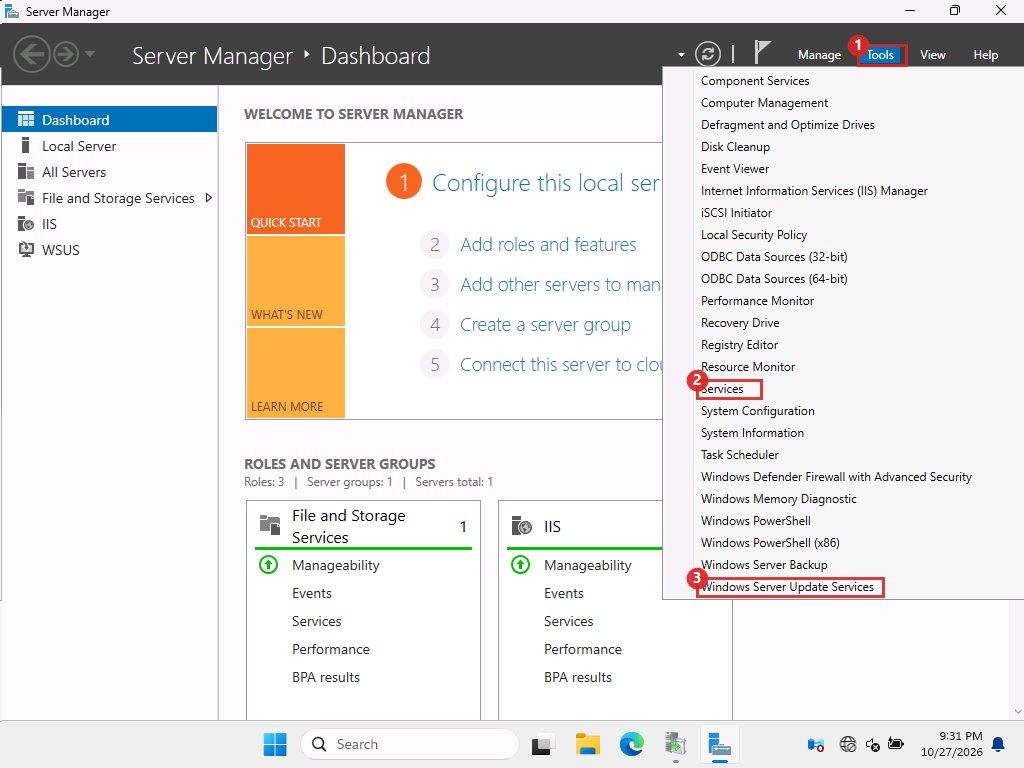
The window is called Update Services. The left tree has Updates, Computers, Synchronizations, Reports and Options. Everything below happens here.
4.4 Set the options
GUI In the left tree click Options. The page lists the settings. Open each one in turn, make the change, click OK.
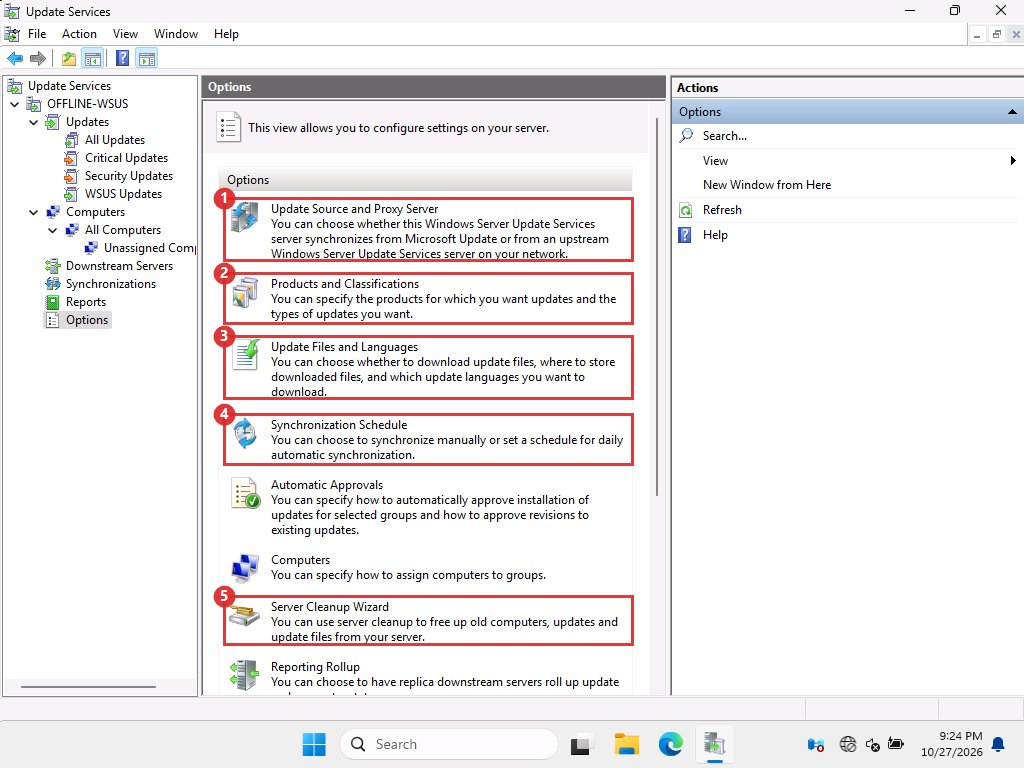
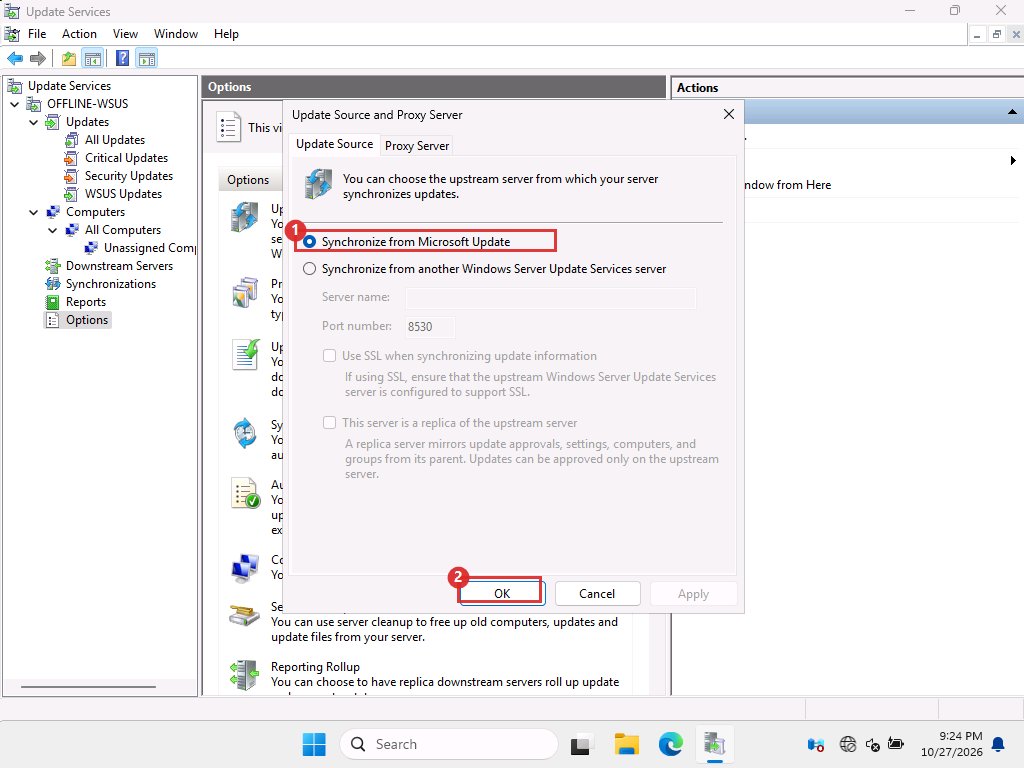
Update Source and Proxy Server 1
Leave 1 Synchronize from Microsoft Update selected. This is the default on both servers. On the offline server it stays selected too, because you never click Synchronize there. Click 2 OK.
Products and Classifications 2 (online server only)
Choose what the online server downloads metadata for. Under 1 Products untick All Products, then tick only Windows 11 (it is under Microsoft and then Windows). Under 2 Classifications tick Security Updates, and Update Rollups if you want the .NET updates. Click OK.
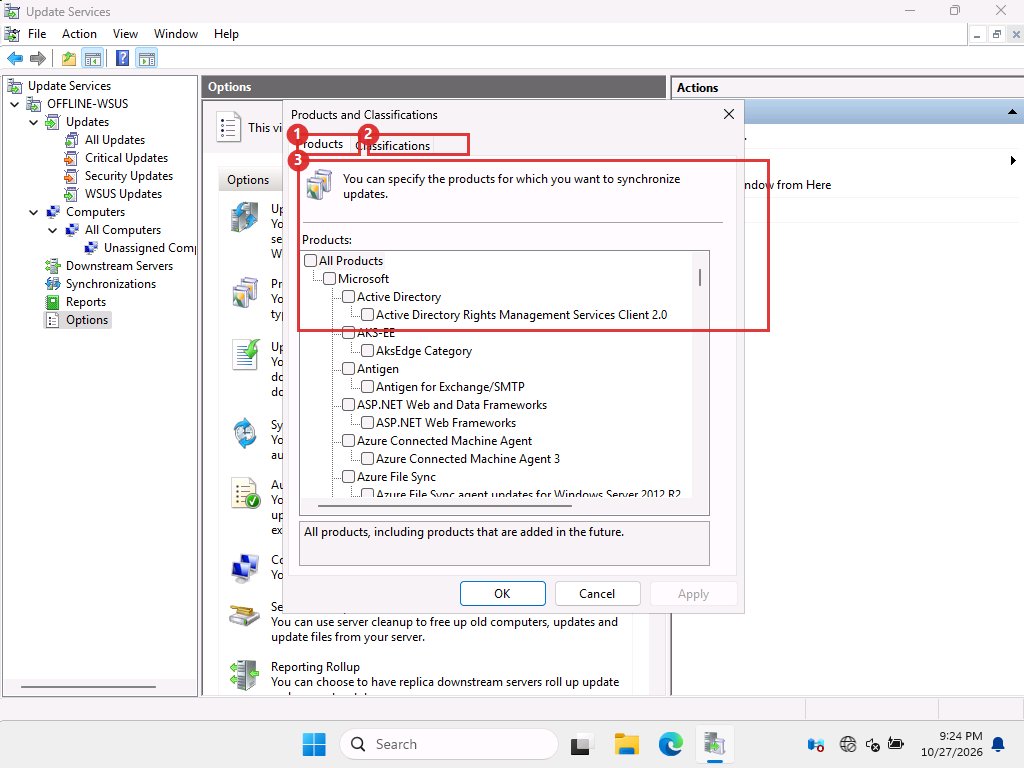
The offline server learns its products from the imported catalog, so you do not set this there.
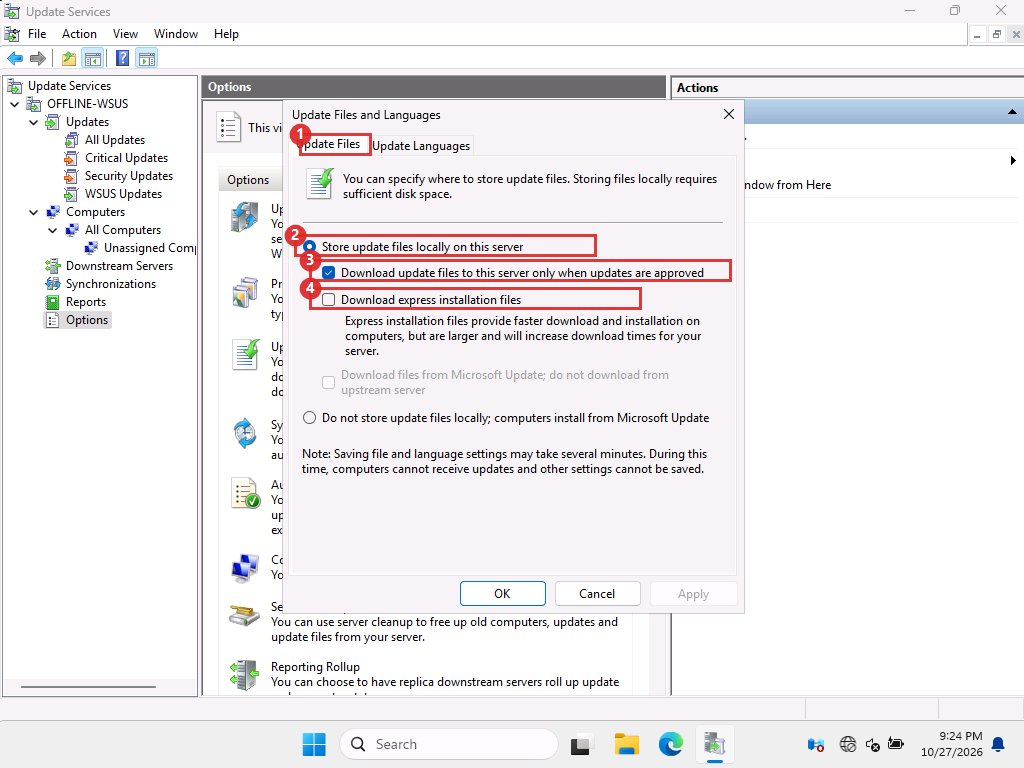
Update Files and Languages 3
On 1 Update Files: select 2 Store update files locally on this server, tick 3 Download update files to this server only when updates are approved, and leave 4 Download express installation files unticked. The two servers must match on this box. Then open the Update Languages tab and keep English only on both servers.
Why only when approved
With this setting a declined or unapproved update never downloads its files. That is why cleanup of old updates freed no disk space in our lab.
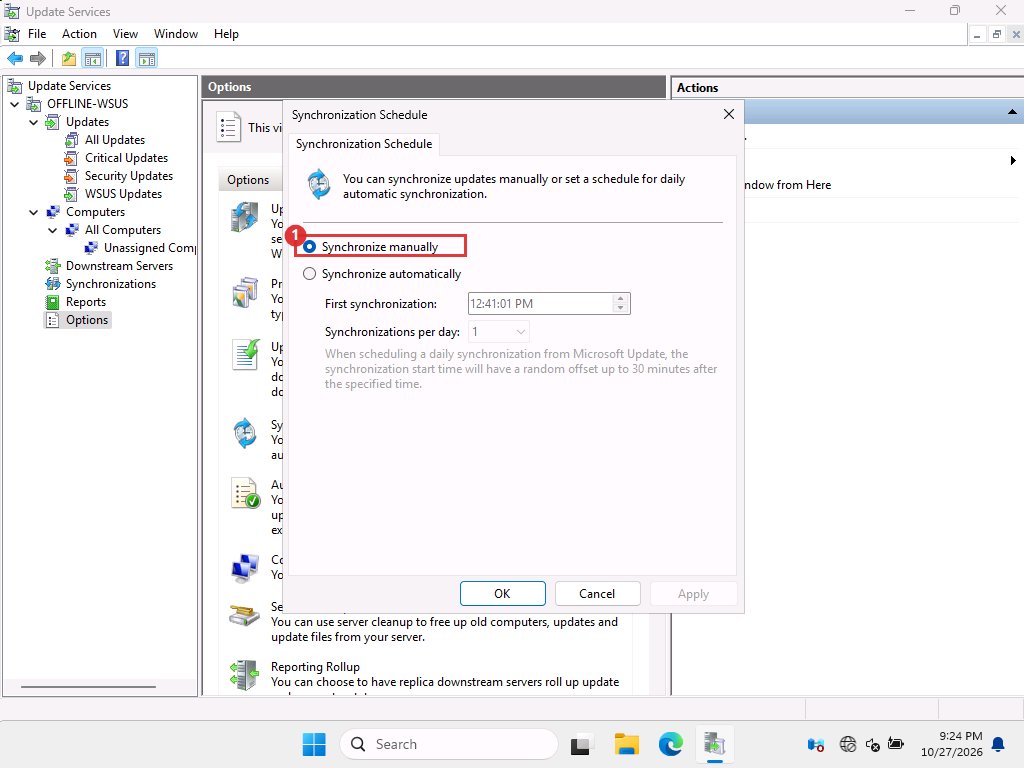
Synchronization Schedule 4
Select 1 Synchronize manually on both servers and click OK. You decide when a sync happens.
4.5 Turn on foreground downloads (online server)
CLI There is no screen for this setting. It fixed stuck downloads in our lab, see Fixing problems.
$c = (Get-WsusServer).GetConfiguration()
$c.BitsDownloadPriorityForeground = $true
$c.Save()
Restart-Service WsusService -Force
4.6 Point the client at the offline server
GUI This is the Group Policy editor on the client. On a domain, edit a Group Policy Object instead. The path is the same.
-
Open the editor
Press Windows + R, type
gpedit.msc, press Enter. -
Go to the WSUS settings
Open Computer Configuration, Administrative Templates, Windows Components, Windows Update, then Manage updates offered from Windows Server Update Service. Double-click 1 Specify intranet Microsoft update service location.
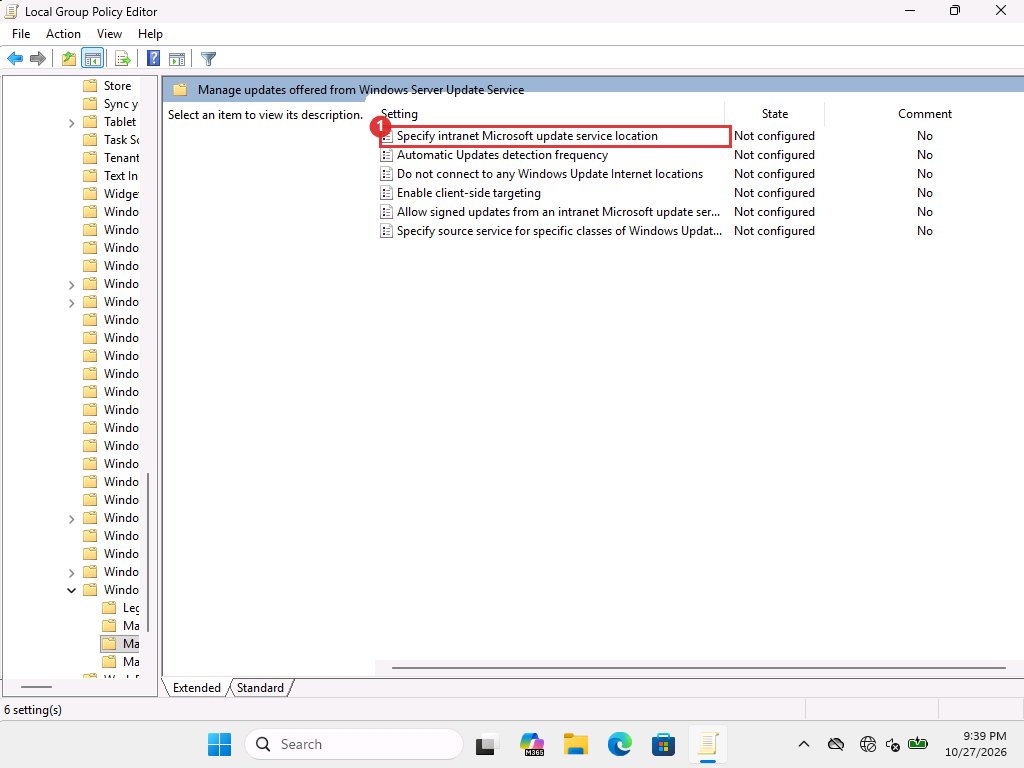
The six WSUS policies. All are "Not configured" until you set them. -
Enter the server address
Select 1 Enabled. In 2 Set the intranet update service for detecting updates type the offline WSUS address, for example
http://10.0.0.10:8530. Type the same address in Set the intranet statistics server below it. Click 3 OK.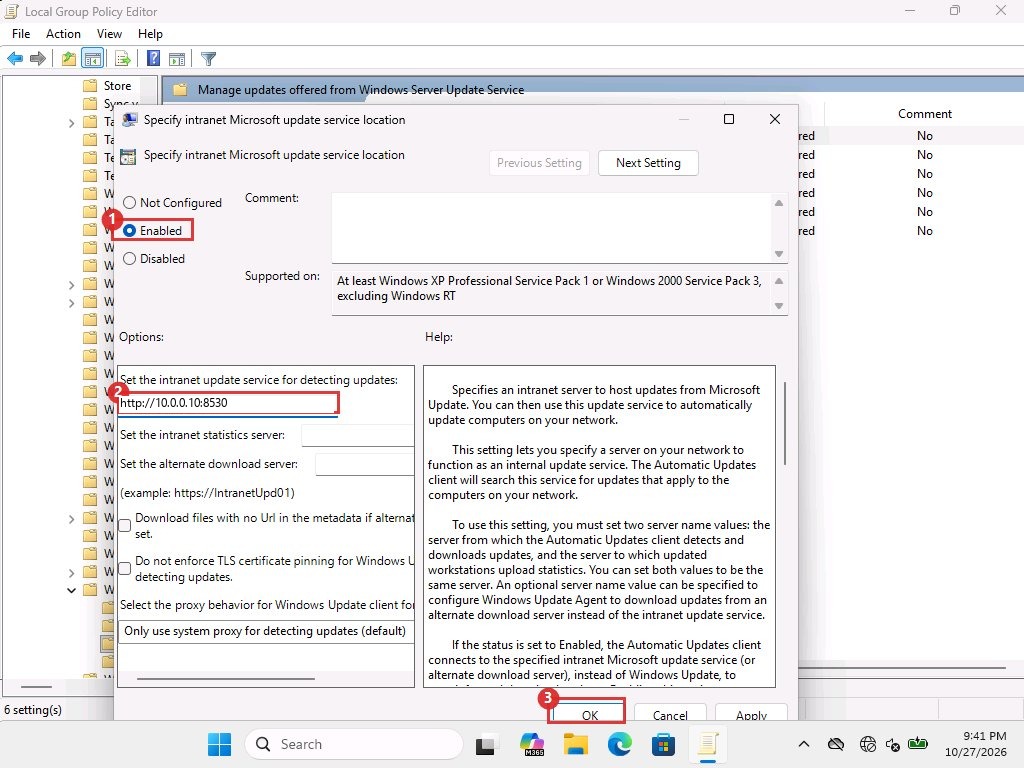
We only filled the first box for the picture and then cancelled. Fill both boxes and press OK. -
Block the internet source
Back in the list, open Do not connect to any Windows Update Internet locations, select Enabled, click OK. Then run
gpupdate /force, or restart the client.
How you know it worked
In Settings, Windows Update, the line "Get the latest updates as soon as they're available" turns grey with the text "This setting isn't available due to your organisation's policy". The finished-state screenshot in Installing on the client shows it.
CLI Our lab set the same values straight in the registry. This is faster for many machines but is not the same as Group Policy: the editor then still shows "Not configured" (we saw that), so use one method and stay with it.
$k = 'HKLM:\SOFTWARE\Policies\Microsoft\Windows\WindowsUpdate'
New-Item $k -Force | Out-Null
Set-ItemProperty $k WUServer       'http://10.0.0.10:8530'
Set-ItemProperty $k WUStatusServer 'http://10.0.0.10:8530'
Set-ItemProperty $k DoNotConnectToWindowsUpdateInternetLocations 1 -Type DWord
New-Item "$k\AU" -Force | Out-Null
Set-ItemProperty "$k\AU" UseWUServer 1 -Type DWord
The client must be able to reach port 8530 on the offline server.