Ignition setup
Connect the Gateway to the new database, switch off Ignition's own partitioning and pruning, and let Ignition create its history table.
Run these on the Ignition Gateway. Menu paths and screenshots are from Ignition 8.1 (Setup PDF, pages 7 to 9). Tiger Data's guide uses different menu names for the same steps; they are listed below.
Menu names in the Tiger Data guide
Tiger Data's Ignition guide (undated, read on 30 October 2026) names the screens differently. We have not run these on a Gateway, so treat the mapping as a pointer:
| This page (Ignition 8.1, from the PDF) | Tiger Data's guide |
|---|---|
| Config, DATABASES, Connections, Create new Database Connection | Connections, Database Connections, Create Database Connection + |
| Config, TAGS, History, new Database historian provider | Services, Historians, Create Historian +, SQL Historian |
1. Update the JDBC driver
The two sources disagree on this
The Setup PDF (Ignition 8.1.37) says Ignition ships a PostgreSQL JDBC driver of version 9.x that does not support hypertable features, and replaces it. Tiger Data's guide says the PostgreSQL driver is "included in every standard Ignition install" and does not replace it. We could not test either way.
A hypertable lives in the database, so the driver version should not decide whether it works, but a very old driver can fail to connect, especially to a server using scram-sha-256 passwords. A safe order: check the driver version listed in the Gateway; if it is older than 42.x, or the connection in step 2 fails, replace it as below.
- Download the latest PostgreSQL JDBC driver (a file such as
postgresql-42.x.y.jar) from jdbc.postgresql.org to the Gateway machine. - In the Gateway go to Config, DATABASES, Drivers, PostgreSQL, Edit.
-
Click Choose File, select the downloaded
.jar, and click Save Changes.
Fig. 5. The JAR File(s) box. The lab used postgresql-42.5.4.jar; use the current 42.x release. -
Check the file is now in
C:\Program Files\Inductive Automation\Ignition\user-lib\jdbc.
2. Add the database connection
Go to Config, DATABASES, Connections, Create new Database Connection, PostgreSQL, Next, and fill in:
| Setting | Value |
|---|---|
| Name | TIMESCALEDB |
| JDBC Driver | PostgreSQL's |
| Connect URL | jdbc:postgresql://<database-host-ip>:5432/tsdb |
| Username | ignition |
| Password | the password you set in Database access |
Leave the other settings at their defaults and click Create New Database Connection. The connection status must read Valid.

If it does not, the cause is almost always the network side: check the firewall and pg_hba.conf steps.
Windows setup
The Documentation PDF connected as postgres with the postgres password. A dedicated user, as above, limits the damage if the Gateway's credentials leak.
3. Set up the history provider
Go to Config, TAGS, History and open the historian for this connection (the PDF names it TIMESCALEDB). If there is none yet, the same page has the button to create a new Database historian provider; select the TIMESCALEDB connection in it.
Turn off Data Partitioning and Data Pruning
Disable both. Timescale's hypertable does both jobs. If Ignition's own partitioning stays on, it starts new tables (sqlth_1_data, then another when the partition length passes) instead of filling one, and the hypertable setup no longer matches the data. Tiger Data gives the same reason: partitioning left on makes Ignition "create multiple history tables" once the historian runs past the partition length. Click Save Changes.
Tiger Data's guide only mentions partitioning. The PDF also disables pruning, since pruning works by deleting old partitions and Timescale's retention policy replaces it. Disabling both is the safe choice.


4. Let Ignition create the history table
Ignition only creates its history tables the first time a tag is historized. The hypertable conversion needs that table to exist, so you trigger it on purpose, with the smallest possible amount of data.
Tiger Data's guide gets the table the same way ("creating any tag and setting History Enabled to True") and does not turn history off again. It converts while data keeps flowing, and its blog post warns that converting a large existing table "takes time and locks the table while it runs". Switching history off first, as the PDF does, keeps the table nearly empty so the conversion is instant. Both work; the PDF's way is safer, and is easiest to do before real data arrives.
This section uses a simulator so the steps work on an empty Gateway. If you already have real tags, skip the simulator and the project: turn history on for one real tag to the new provider, then follow the same turn-it-off steps below.
a) A test device and 12 test tags
Go to Config, OPC UA, Devices, Create new Device, Programmable Device Simulator, Next:
| Setting | Value |
|---|---|
| Name | TAGSIMULATOR |
| Enabled | True |
| Repeat Program | True |
| Base Rate (ms) | 1000 |
Click Create New Device. Create a text file tags_sim_program.csv in your Downloads folder with this content:
Time Interval, Browse Path, Value Source, Data Type
"0","Ramp/Ramp10","ramp(0.0, 100.0, 10, true)","Float"
"0","Ramp/Ramp20","ramp(0.0, 100.0, 20, true)","Float"
"0","Ramp/Ramp30","ramp(0.0, 100.0, 30, true)","Float"
"0","Ramp/Ramp40","ramp(0.0, 100.0, 40, true)","Float"
"0","Ramp/Ramp50","ramp(0.0, 100.0, 50, true)","Float"
"0","Ramp/Ramp60","ramp(0.0, 100.0, 60, true)","Float"
"0","Sine/Sine10","sine(0.0, 100.0, 10, true)","Float"
"0","Sine/Sine20","sine(0.0, 100.0, 20, true)","Float"
"0","Sine/Sine30","sine(0.0, 100.0, 30, true)","Float"
"0","Sine/Sine40","sine(0.0, 100.0, 40, true)","Float"
"0","Sine/Sine50","sine(0.0, 100.0, 50, true)","Float"
"0","Sine/Sine60","sine(0.0, 100.0, 60, true)","Float"
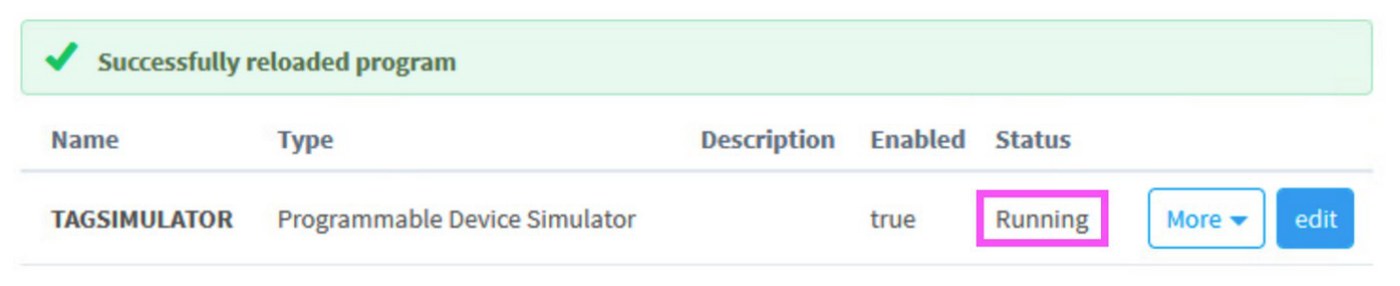
Then open the device: Config, OPC UA, Devices, TAGSIMULATOR, More, edit program. Set Load Program to Load from CSV, click Browse…, choose the file, click Open, then Load Simulator Program. The list of simulated tags appears. Click Save Program and check the device status is Running.
b) A project with the tags
- In the Designer, create a new project (the PDF calls it
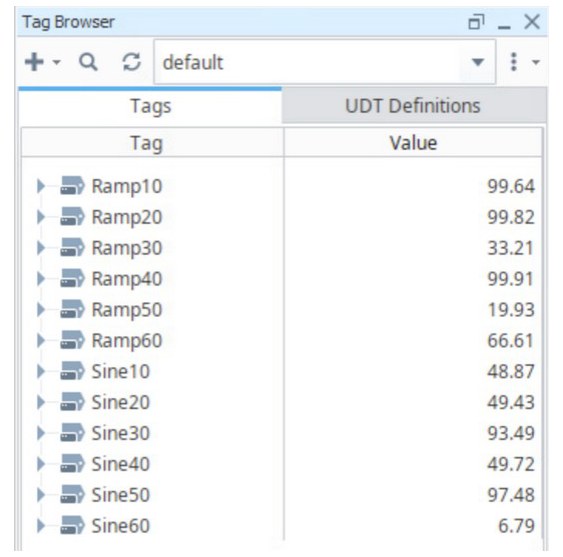
TIMESCALE). - In the Tag Browser, click +, then Browse Devices…. Expand Ignition OPC UA Server to the Ramp folder. Hold Shift to select all its tags and add them with the → key to the default provider. Do the same for Sine. Click OK. The Tag Browser must look like this:
c) A tag group for Timescale
In the Tag Browser, open the tag group editor (Edit Group Tags) and add a group:
| Setting | Value |
|---|---|
| Name | Timescale |
| Mode | Direct |
| Rate (ms) | 1000 |
| Data Mode | Subscribed |
| Min Time Between Samples | 1 sec |
| Max Time Between Samples | 1 min |
Click OK.
d) Create the table, then switch history off
Double-click the Sine10 tag. In the Tag Editor, open the History category and set:
| Setting | Value |
|---|---|
| History Enabled | true |
| Storage Provider | TIMESCALEDB |
| Deadband Mode | Percent |
| Historical Deadband | 0.01 |
| Sample Mode | Tag Group |
| Historical Tag Group | Timescale |
Keep this quick
Click Apply, and within 2 to 5 seconds (the PDF's figure) set History Enabled back to false and click Apply again. You only want Ignition to create the tables and write a few samples. At the end there must be no tag with history enabled for the TIMESCALEDB provider.
The PDF says to switch back "the Ramp10 tag". It only enabled history on Sine10, so this is almost certainly a typo: turn off the tag you turned on.
Then go to Config, Tags, History, TIMESCALEDB and disable the provider itself, so nothing writes to the table while you convert it.

false, status Disabled.5. Check the tables in pgAdmin
On the database host open pgAdmin and go to Servers, your server, Databases, tsdb, Schemas, public, Tables. Ignition has created a set of tables.
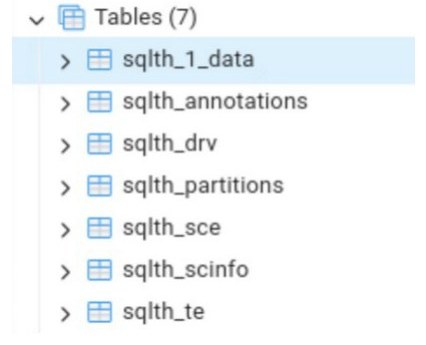
public schema.The data table is named sqlth_1_data. The number is managed by the Gateway:
- A setup from scratch on the same Gateway creates
sqlth_2_data, thensqlth_3_data, and so on. - If you see a table name in any other format, the history provider is misconfigured. The usual cause is Data Partitioning left enabled, from step 3.
You can run the SQL in this guide in pgAdmin's Query Tool, with psql, or, as Tiger Data suggests, in Ignition's own Simple Database Editor.
Right-click sqlth_1_data, choose Query Tool, and run:
The output must show a few recorded samples of the tag.
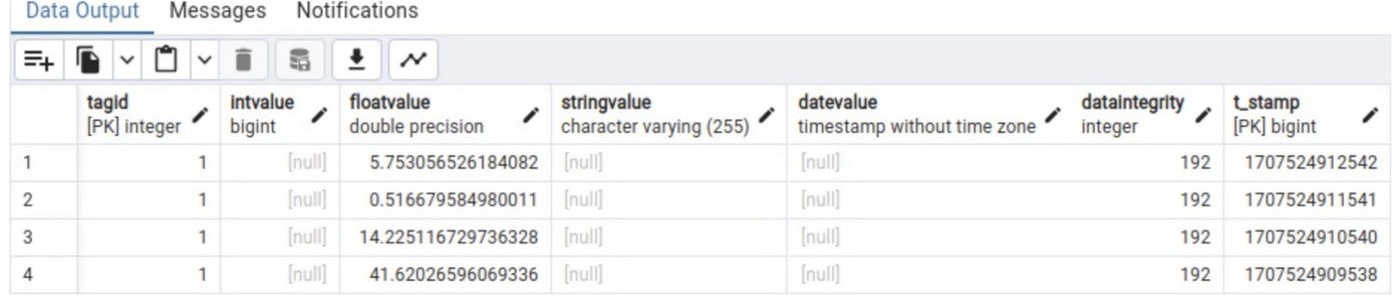
dataintegrity 192 means good quality, and t_stamp is milliseconds since 1970.